阿里云轻量应用服务器wordpress升级php步骤
本文共 3143 字,大约阅读时间需要 10 分钟。
文章目录
1.首先更新依赖包。
yum -y update
2.安装依赖包
yum -y install libxml2 libxml2-devel openssl openssl-devel bzip2 bzip2-devel libcurl libcurl-devel libjpeg libjpeg-devel libpng libpng-devel freetype freetype-devel gmp gmp-devel libmcrypt libmcrypt-devel readline readline-devel libxslt libxslt-devel zlib zlib-devel glibc glibc-devel glib2 glib2-devel ncurses curl gdbm-devel db4-devel libXpm-devel libX11-devel gd-devel gmp-devel expat-devel xmlrpc-c xmlrpc-c-devel libicu-devel libmcrypt-devel libmemcached-devel libzip gcc-c++
3.转到 /usr/local/src 目录,下载php7.3.5
cd /usr/local/src
wget https://www.php.net/distributions/php-7.3.5.tar.gz 4.解压安装包,并进入目录
tar -zxvf php-7.3.5.tar.gzcd php-7.3.5
5.添加用户和组
groupadd wwwuseradd -g www www
6.开始编译
./configure --prefix=/usr/local/php --with-fpm-user=www --with-fpm-group=www --with-curl --with-freetype-dir --with-gd --with-gettext --with-iconv-dir --with-kerberos --with-libdir=lib64 --with-libxml-dir --with-mysqli --with-openssl --with-pcre-regex --with-pdo-mysql --with-pdo-sqlite --with-pear --with-png-dir --with-jpeg-dir --with-xmlrpc --with-xsl --with-zlib --with-bz2 --with-mhash --enable-fpm --enable-bcmath --enable-libxml --enable-inline-optimization --enable-mbregex --enable-mbstring --enable-opcache --enable-pcntl --enable-shmop --enable-soap --enable-sockets --enable-sysvsem --enable-sysvshm --enable-xml --enable-zip --enable-fpm
这里会提示 configure: error: Please reinstall the libzip distribution,我们需要移除libzip,手动安装最新版本
7.安装libzip
(1)先安装cmake
cd /usr/local/srcwget https://github.com/Kitware/CMake/releases/download/v3.14.3/cmake-3.14.3.tar.gztar -zxvf cmake-3.14.3.tar.gzcd cmake-3.14.3./bootstrapmake && make install
(2)再编译安装libzip
yum remove libzip -ycd /usr/local/srcwget https://libzip.org/download/libzip-1.5.2.tar.gztar -zxvf libzip-1.5.2.tar.gzcd libzip-1.5.2mkdir buildcd buildcmake ..make && make install
(3)执行以下命令
vi /etc/ld.so.conf#添加如下几行/usr/local/lib64/usr/local/lib/usr/lib/usr/lib64#保存退出ldconfig -v # 使之生效
8.再次编译PHP7.3
make && make install
9.编译完成后,添加环境变量
vi /etc/profile#添加以下内容到最后PATH=$PATH:/usr/local/php/binexport PATH#刷新环境变量source /etc/profile
10.配置文件
# 将启动脚本复制到init.d中。cp /usr/local/src/php-7.3.5/sapi/fpm/init.d.php-fpm /etc/init.d/php-fpm73# 给启动脚本加上执行权限chmod +x /etc/init.d/php-fpm73# 将默认配置文件复制为.conf文件cp /usr/local/php/etc/php-fpm.conf.default ${PHP73_DIR}/etc/php-fpm.conf# 添加pool的配置cat << EOF > /usr/local/php/etc/php-fpm.d/www.conf[www]listen = /home/www/logs/php73-fpm.socklisten.mode = 0666user = wwwgroup = wwwpm = dynamicpm.max_children = 128pm.start_servers = 5pm.min_spare_servers = 5pm.max_spare_servers = 15pm.max_requests = 300rlimit_files = 1024slowlog = /home/www/logs/php73-fpm-slow.logEOF 11.修改apache
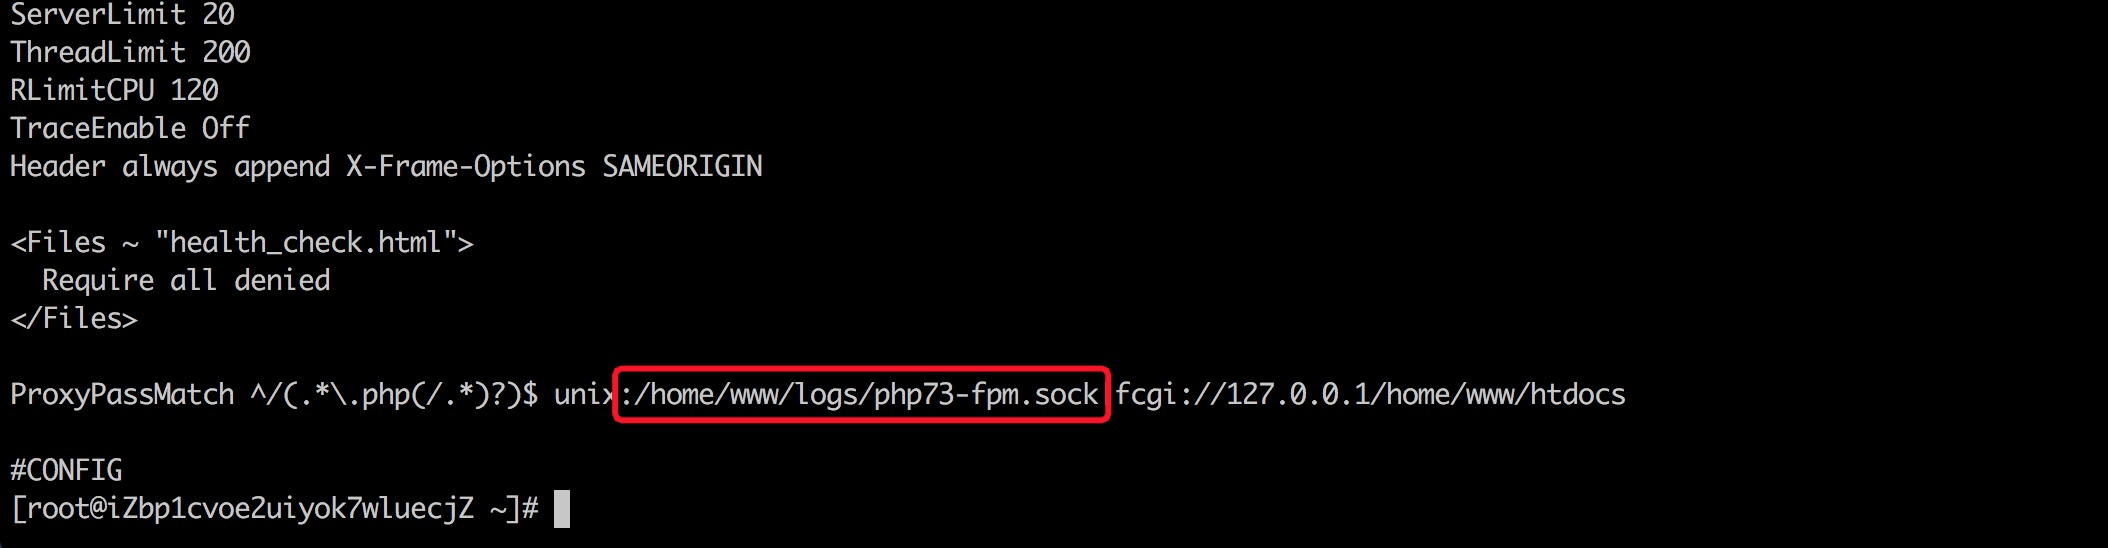
镜像中默认是用的php-fpm,使用的是socket方式的监听,Apache对应配置文件/usr/local/apache/conf/httpd.conf,其中配置如下:
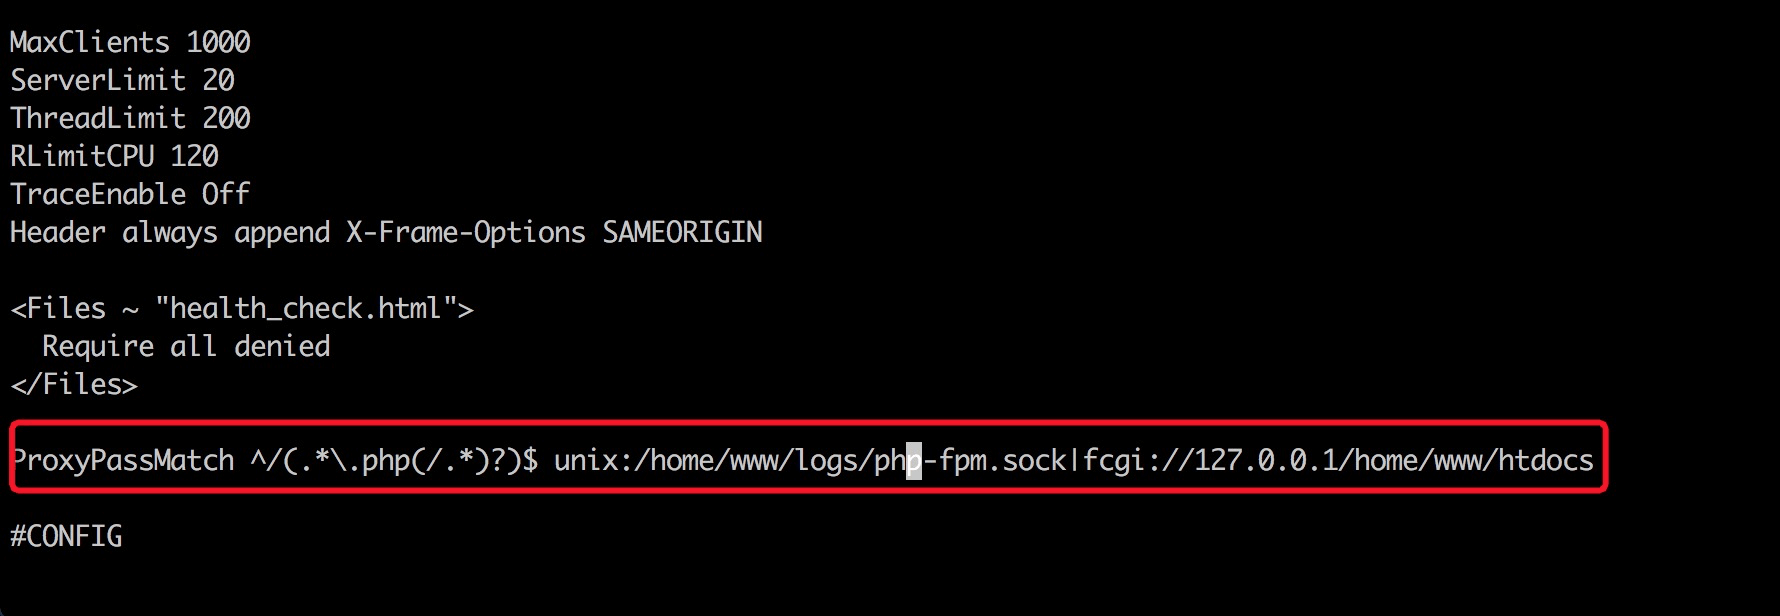
需要修改其中socket的文件路径指向到新版本的PHP就可以了,在/usr/local/php73/etc/php-fpm.d/www.conf有指定,新的配置到/home/www/logs/php73-fpm.sock即可,如图:
12.重启服务
# 停止旧版本的PHP(实际不停止也不影响,停止可以减少一些系统资源占用)/etc/init.d/php-fpm stop# 启动新版PHP-FPM/etc/init.d/php-fpm73 start#启动报错请修改文件名修改/usr/local/php/etc/php-fpm.conf.default为php-fpm.conf# 重启apache/etc/init.d/apachectl restart
转载地址:http://zbgwi.baihongyu.com/
你可能感兴趣的文章
在ubuntu12下静态编译freetype库.
查看>>
CImg库编译使用.
查看>>
SQL Server循环执行动态SQL语句.
查看>>
windows MySQL报"2006 - MySQL server has gone away"错误,解决过程.
查看>>
ubuntu10.4网卡名由eth0改为eth4,导致获得不了IP地址.解决方法.
查看>>
CheckPoint关键词做字段名使用.
查看>>
Qt QSplitte分割器使用(用户手动改变窗口大小)
查看>>
根据高度图计算体积等。
查看>>
Qt动态加载动态库
查看>>
使用VS2015创建纯C动态库。
查看>>
MFC和Qt分别使用Qt生成的Dll。
查看>>
Qt安装路径中的platforms文件夹
查看>>
Qt5 Crash When Open File With QFileDialog
查看>>
关于Visual Studio "当前不会命中断点.还没有为该文档加载任何符号"的解决方法
查看>>
source ~/.bashrc出现if: Expression Syntax.
查看>>
MYSQL架构与工作机理
查看>>
java8新特性
查看>>
git clone时RPC failed; curl 18 transfer closed with outstanding read data remaining
查看>>
Java8内存模型—永久代(PermGen)和元空间(Metaspace)
查看>>
linux 查看进程 ps -A 与ps -ef 区别
查看>>